UK Edition • 15th October 2026

UK Edition • 15th October 2026
Holding the West hand below, what is your opening lead?
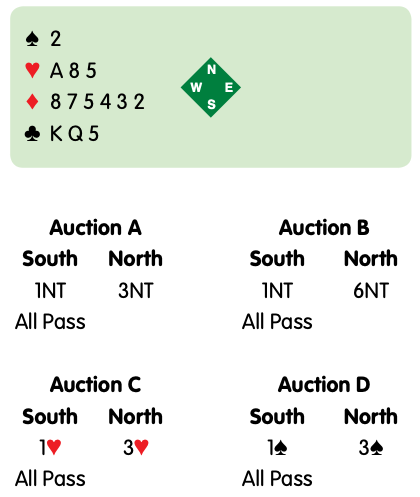
After Auction A, lead the ♦️7. Hopefully, you can set up diamond tricks.
After Auction B, lead the ♣️K. Your target against 6NT is two tricks. You expect to drive out the ♣️A and cash the ♣️Q when you gain the lead with the ❤️A.
After Auction C, lead the ♠️2. Partner should have some points, otherwise why have opponents not bid game? Your ❤️A means declarer won’t be able to draw trumps quickly, so you have good prospects of ruffing a spade.
After Auction D, lead the ♦️7. Hopefully, this will be passive. If you are really lucky, it might lead to partner ruffing a diamond. A singleton trump is not a good lead. Admittedly, you have the ♣️K and ♣️Q but leading the ♣️K could easily cost a trick.
Did you get these right? Clearly, you know how to listen to the bidding. The aim of this article is to show you that there are more clues from the bidding than you may have realised.
My next example is rather harder. Your opponents are sound players so you can rely on their bidding. What are your thoughts about your hand in relation to the bidding sequence and what is your choice of lead?
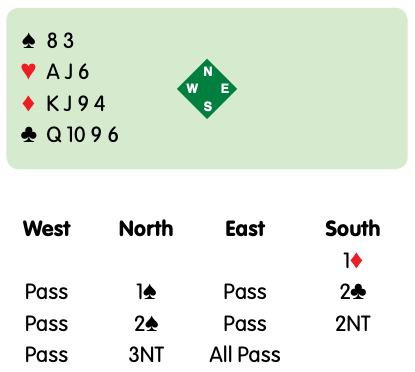
There are two main points.
First, North-South will not have many points to spare for their 3NT. North could bid only 2♠️, suggesting a weak hand (6-9 points) with six goodish spades. He won’t have much outside the spade suit. South suggested game only tentatively with 2NT. His bidding on the first two rounds suggested five diamonds and four clubs. 2NT shows a stopper in the unbid suit, hearts. He hasn’t got room for more than two spades and if he had two spades, it would be logical to raise 2♠️ to 3♠️ rather than bid 2NT.
Second, you have holdings in the minor suits that will give declarer a torrid time. If he can get to dummy to finesse a minor suit, that finesse will fail. Their spades are most unlikely to be solid and partner will be in a similar position to deal with any spade finesse. By now, you can almost write down all four hands.
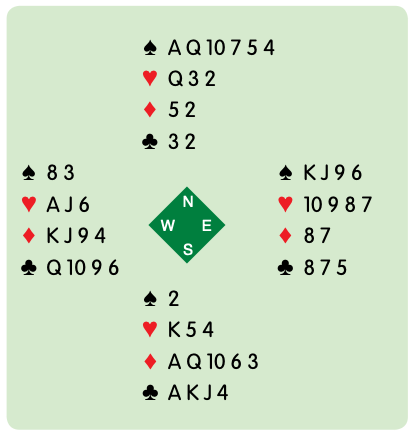
Be passive. A spade lead (from your weakness and through strength) feels best. Suppose declarer tries the ♠️10. Partner wins the ♠️J and switches suit. When you next get the lead, try another spade. Declarer and dummy might have 25 points, but how many tricks do you think they will make? They have five obvious tricks. Inevitably, you will have to give them a trick or two as you have to lead away from honours later in the hand, but they will surely go at least two off.
Most of this information was available to you from the auction and the position of your honour cards over declarer. I tend to get vibes when defending. Sometimes, my vibes are very positive, as here. I am very optimistic that I will beat the contract. In an example as extreme as this, I would certainly have doubled. If you are worried that a freak distribution, or opponents who have bid misleadingly, will lead to 3NT making maybe one time in ten, I would say that if you never double a making contract, you are spurning a lot of good penalties.
On other hands, my vibes might be far more negative. If playing rubber bridge or teams of four, I might conclude that my chances of beating a contract are poor, leading me to make a risky, almost desperate, lead.
Generally, a bidding sequence such as 1NT-2NT-3NT suggests that declarer has 13-14 points while dummy has 11-12 points. Declarer has little to spare for his contract. That suggests I will resolve any borderline decision about the opening lead in favour of the passive option. A bidding sequence of 1NT-3NT tells me far less. Declarer could have 12 or 14. Dummy could have anything from 13 to 18.
Try your skill at these examples. What do you lead from the hand below after auctions E and F?
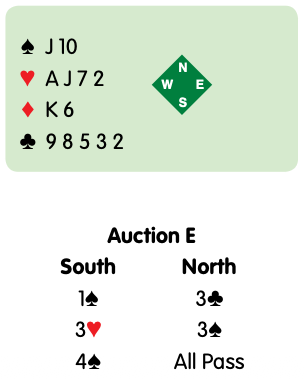
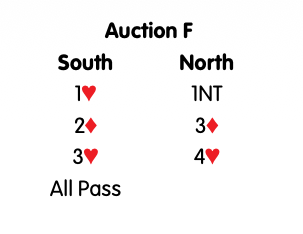
After Auction E, negative vibes are inevitable. North has shown a strong hand with at least five good clubs by jumping to 3♣️. You have no unpleasant surprises for declarer. The fact that you have five little clubs suggests dummy’s clubs may be solid, providing declarer with discards. It is difficult to imagine four tricks for the defenders, unless partner has the ♦️A.
Playing teams or rubber bridge, when overtricks count for little, I would start with the ♦️K, hoping for this layout.
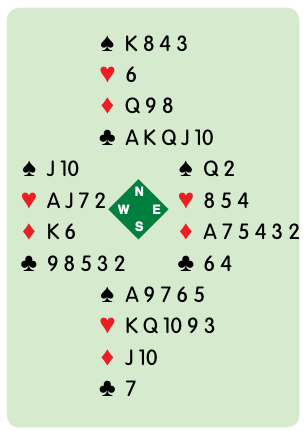
When the ♦️K wins trick 1 (partner encouraging), I know he has the ♦️A. The simplest way forward is to cash the ❤️A and continue with the ♦️6 to partner’s ♦️A. His diamond continuation will promote a trump trick for the defence. Lucky? Indeed, but after this strong bidding, you are reliant on a bit of luck.
Note that, if you led passively, declarer would draw trumps in two rounds, discard his losing diamonds on dummy’s clubs and make twelve tricks. That was entirely predictable on the bidding.
Of course, if you were playing duplicate pairs, the decision would be a bit harder because you cannot afford to spray around overtricks at that form of scoring.
However, I would still lead the ♦️K. It is almost inevitable that unless you make a positive effort to take any diamond tricks you have, they will disappear. The most likely scenario is that declarer can discard the diamonds in his hand on dummy’s clubs, particularly because you have five weak clubs.
Slightly less likely, given your heart holding, is that declarer will discard dummy’s diamonds on his hearts.
After Auction F, my vibes are far more positive. They have only just staggered into game. My red suit cards are well positioned, sitting after declarer and are likely to provide three tricks. I have no need to take risks. A safe, passive ♠️J is called for.
Here is the layout:
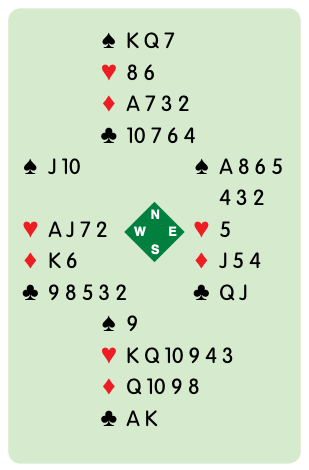
Partner will take the ♠️A and switch to a club. As long as you both continue to defend passively, you will come to three red suit tricks.