UK Edition • 14th October 2026

UK Edition • 14th October 2026
by Andrew Kambites
It is incredibly hard to start learning bridge. You are instantly bombarded with too much to grasp: the laws, mechanics, bidding, card play, and more. Not surprisingly, the holy grail of teaching bridge has been to find ways of breaking down this bewildering array of information into smaller units that can be learned one bit at a time.
A significant breakthrough has been the introduction of mini bridge, which initially removed the complex art of bidding from the equation until the learner had come to terms with following suit, dummy, and elementary card play. However, even basic card play by itself requires a huge amount of skill.
The poor beginner was thrown in at the deep end: told to count winners, count losers, look for ways of developing winners that were not immediately cashable, consider communications, and much more. As the learner tried to faithfully put all this into practice, time ticked away and there was the danger that rigor mortis might set in for the other three players.
Card play needed to be broken down into more easily manageable chunks, and in my new series All You Need to Know About Card Play, I start by considering single suit combinations, which are the building blocks of card play. First master how to handle 13 cards in a single suit, then when you are reasonably familiar with this, try to put it into practice with the whole deal of 52 cards.
In no trumps the maximum number of tricks you can make in a suit is the number of cards held by the longer holding.
Assume there are no trumps. The diagram for each suit shows the declarer holding and dummy. Try to play these combinations to make as many tricks as possible. Assume you can lead from either hand.
You might find it helpful to construct the combinations from a pack, randomly dealing the missing cards to East and West.
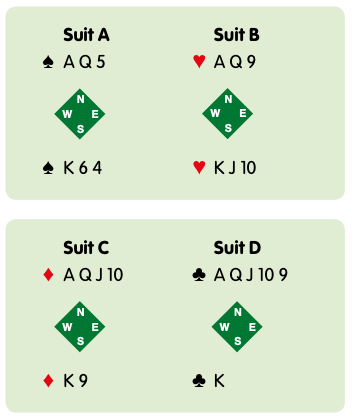
The spade and heart holdings each provide three tricks. Your heart holding in Suit B appears to be more sturdy than your spade holding in Suit A, but despite having the top six hearts you cannot expect to take more than three heart tricks.
To see why, try playing this combination. Suppose you start with the ♥️A. The rules force you to continually play two of your “winners” on the same trick. All your winners disappear after just three tricks.
In the minor suits shown in Suits C and D you hold the same cards as in hearts, but if you have the diamonds shown in Suit C you can make four tricks. Admittedly there will be wastage on the first two tricks, but dummy’s last two diamonds will be able to take tricks separately.
Note also that in playing diamonds it is correct to start with the ♦️K, allowing you to take the second diamond trick in dummy and persevere with the suit.
Start by cashing the high cards from the shorter holding.
In the clubs shown in Suit D there is even less wastage and you can make five tricks. Start with the ♣️K and overtake it with dummy’s ♣️A, leaving you with the lead in the right hand to continue playing clubs.
These tricks, being immediately cashable, are called top tricks.
The maximum number of tricks you can make in a suit is the number of cards held by the longer holding minus the number of top cards you must force out.
Now try to work out how many potential tricks you have with these holdings.
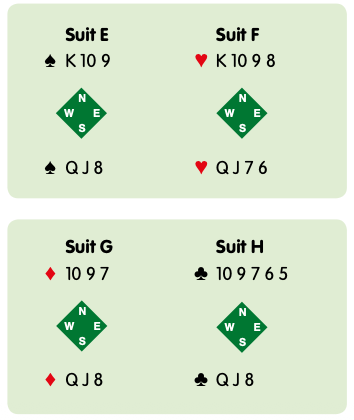
With Suit E you have all of the top spades except the ace. This reduces the number of tricks by one, leaving you with two. Suppose you immediately play on spades. A defender takes the ♠️A and leads another suit which you can win. You now have two spade tricks to cash.
Similarly, in Suit F with hearts, once you have dislodged the ♥️A you have three tricks for the taking.
In the minor suits you have two top cards missing, the ace and the king. If you need to develop tricks, you must patiently play on the suit, forcing out these missing honours and regaining the lead in other suits.
The diamonds in Suit G give you one trick and the clubs in Suit H provide three.
You must be prepared to lose the lead temporarily in order to develop tricks.
You will have seen that with the suits in E to G you must lose the lead before you can enjoy your winners. It is worth mentioning that it is natural for inexperienced players to have a great fear of giving up the lead. They fear that the opponents can do something dreadful.
Much of the time this fear is misplaced. For example, consider Layouts J and K. In each case you are in 3NT and West leads the ♥️K.
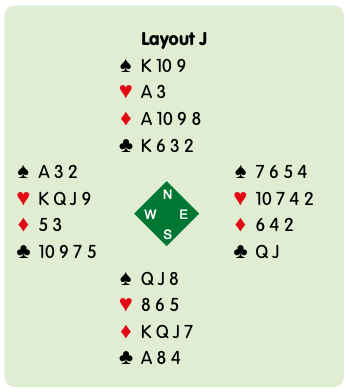
In Layout J the following facts are relevant:
When you take your ♥️A, you can safely cash four diamond tricks (in case defenders make careless discards). But now the moment of truth has come. You must now play on spades, whatever the risk. You must now play on spades, whatever the risk. We say that the missing eight hearts break 4-4 if each defender has four (see explanation below).
With the opposition hearts breaking 4-4, the defenders cannot cash more than three hearts so you are lucky. Of course, there was no guarantee that hearts would break 4-4, but if you are dominated by fear of losing the lead and cash the ♣️A-K, you have now set up two extra club winners for the defenders, so you fail in 3NT even though the heart split was kind to you. You must concentrate on making your contract when it is possible to succeed and not worry too much about the possibility of failure.
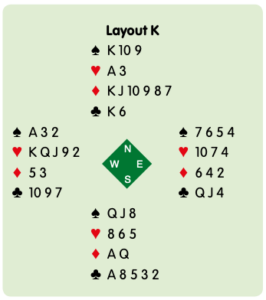
In Layout K, you have the same high cards between your hand and dummy, but this time you can make six diamond tricks, so you have nine top tricks. You should make sure you cash them to fulfil your contract. If you are lured by the potential of the spade suit, West can take the ♠️A and cash four hearts to defeat you.
In Layout K, you are lucky enough to have enough top tricks to fulfil your contract without taking any risk, but Layout J is more common. In most contracts you need to develop tricks from cards that are not immediately winners. It is losing bridge to run away from the problem. The beginner with Layout J cashes seven tricks and then wonders where the next two are coming from. He loses the last 6 tricks. Trick 13 counts as much as trick 1.
So far, I have concentrated on developing tricks by brute force. Now, I turn my attention to developing length winners.
In no trumps a lowly two is a winning card if nobody else has a card left in the suit.
How many tricks do you expect to make with these combinations?
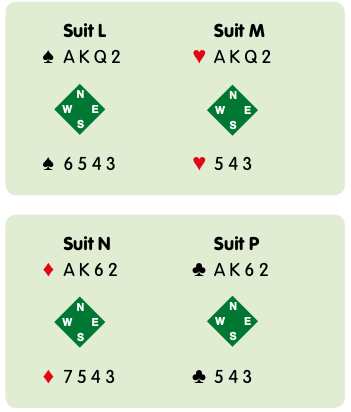
With Suit L you cannot be sure. Consider this spade suit. There are five spades missing: the ♠️J 10 9 8 7. Suppose they are distributed as in diagram Layout Q below.
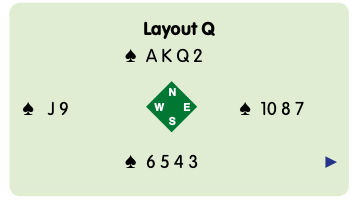
In Layout Q, by the time you have cashed the ♠️A-K-Q, neither opponent has a spade left. Nobody can beat your ♠️6, which takes a fourth trick by length.
On the other hand, they may be as in Layout R. This time, your top three honours fail to draw the missing spades and East’s remaining ♠️J prevents your ♠️6 scoring.
There are two noteworthy points here. First, that while it does not require great skill to make tricks by brute strength, if you learn to take tricks with lowly sixes you are starting to master card skills.
Secondly, the trick making capacity of your small cards may depend not only on which cards are missing, but also which opponent has them. You need a little bridge terminology here. In Layout Q, one opponent has three spades and the other two. We say that the missing spades break 3-2. In Layout R spades break 4-1.
It is worth considering how to count the missing cards. Start by subtracting your eight spades from 13. That leaves them with five. Count them down as you play the suit. On the first round they both follow, so they now have three, etc.
So how about Suits M, N and P? In Suit M, you are missing six hearts and North’s fourth heart will be worth a trick if hearts break 3-3.
The diamond suit in Suit N will give you a third trick if the missing five diamonds break 3-2. In that case, cashing your ♦️A-K leaves just one diamond at large, and you must force them to take it. Then the ♦️7 becomes a length winner.
Finally, in Layout P if the clubs break 3-3, playing the ♣️A-K and conceding a club will give you a third trick.
I will look at the probabilities of suit breaks and how it affects your choice of play in a later article.
BRIDGE Magazine January 2017