Dummy goes down. You are declarer. How should you plan your campaign? I have put a lot of thought into this, without definite conclusions. The standard approach is to give the inexperienced player a list: count winners, count losers, look for entry problems etc. All very virtuous but there is one flaw that is rarely admitted: in practice, it just doesn’t work for most inexperienced players. There are too many things to do and too little time. There is also the matter of stamina. A bridge session lasts for three hours: you have to formulate a strategy that doesn’t leave you exhausted. There are players who can successfully work through the tick list, but they tend to be fairly competent and, in practice, skip a lot of the hard work by intuition.
I am reminded of my elder son (now a professor of Mathematics) when he took his first driving lesson. He said, ‘This doesn’t work. There are three pedals and I have only two feet.’ Within a fortnight he had forgotten about his feet and was driving well.
If you have an approach that works for you, I certainly don’t want to change it. However, some of my ideas might help you so please give me a hearing. Look at Suit A. Does anything occur to you?
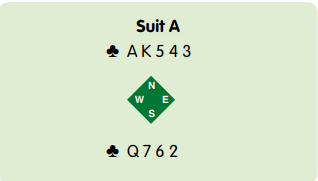
A 3-1 club break is more likely than a 2-2 break, so look at Layout B and imagine you are playing in no-trumps. Do you notice a problem now?
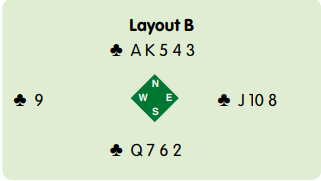
I enjoy giving this to players. Good players immediately see the problem. The suit is potentially blocked. Imagine playing it. You start with the ♣️Q, then enter dummy with the ♣️A and cash the ♣️K. Which club have you retained in your hand? If you have the ♣️7 you have no choice but to win the fourth club trick in your hand and then you have to find a way of re-entering dummy to gain access to your fifth club trick. Therefore, you must retain your ♣️2 so that on the fourth round of clubs you can win the trick in dummy.
In my experience, learners can look at this club suit for ages without realising there is a problem.
So how do good players recognise this? In my view, it is mainly experience. They have come across this type of problem before, and probably got it wrong.
The difference between a player who is capable of progressing and a player who will never get beyond a certain level isn’t that the good player doesn’t make mistakes. It is that he learns from those mistakes. He stores his accumulated experience in a sort of memory bank and recognises a pattern he has seen before. In this article and the quiz that follows, I hope to add some experience to your memory bank.
This example demonstrates that there are two key elements of card play: diagnosis and finding the solution. Often the diagnosis is the hardest part. In Suit A, if I point out the potential problem in the club suit, most players can work out the solution. In this article I am concentrating on diagnosis.
Spend a few moments looking at dummy.
So how should you proceed when dummy goes down? I certainly spend a few moments looking at dummy: frequently something like the potential club blockage in Suit A stands out. I give my memory bank time to kick in. The declarer who instantly calls for a card from dummy is certainly not giving himself the best chance. The old chess rule applies here. In chess, you have to move a piece if you touch it. Chess players who find it impossible to curb their instincts to immediately grab a piece are taught to sit on their hands until they have come to a properly reasoned decision. That won’t help in bridge because the laws tell you to call for a card from dummy rather than pick it up, but perhaps you need to devise a similar strategy. Try pretending you are a trappist monk (sworn to silence) for the first 30 seconds.
Try to count top tricks, then identify sources of extra tricks (including tricks that can definitely be developed by driving out top tricks, length tricks and finesses). Also, try to count losers.
Look at Hands C and D below.

In Hand C, you have 11 top tricks, six spades, the ♦️A-K and ♣️A-K-Q. You need a twelfth and that will come from developing a heart trick. You have two losers in your hand—a heart and a diamond. I find it helpful to pair up losers in the stronger hand with winners in the opposite hand. You cannot avoid a heart loser, but you can develop a heart trick in dummy to discard your ♦️2. The key to this hand is pairing up your losing ♦️2 with one of dummy’s hearts. You must diagnose another potential problem—that you need access to your heart winner. This can only come with the ♠️Q, therefore you cannot start by drawing trumps. You must set about establishing the heart winner, so you win the ♠️A at trick 1 and lead a heart.
Note that planning the hand has resulted in you ignoring two of the guidelines of declarer play. Normally you tackle a suit by leading the honours first from the short hand, but here you must play spades unnaturally in order to retain an entry to dummy’s heart winner. Equally, it is often good advice when playing a trump contract to start by drawing trumps, but here you have a good reason to do otherwise.
How about Hand D? I have only put Hand D in to demonstrate that planning is not always possible. There are no patterns in the suits (eg touching honours where you know that by driving out higher honours you can establish guaranteed winners). You are not even sure whether to play dummy’s ♥️Q at trick 1. If you do manage to win trick 1 with the ♥️Q, you don’t know what to do next. It is the sort of hand where I try a few finesses, see if suits break and hope my opponents help me by opening up new suits. In other words, I bumble around and see what happens. This often works. This sort of hand is as hard for the defenders as it is for declarer.
Generally speaking, the higher the level of the contract, the easier it is to plan the play. Playing in a slam you are likely to have good sequences of honours and you won’t lose the lead often. Equally, playing in no-trumps it can be hard to count losers, because you won’t necessarily know how your weaker suits are breaking.
In Hands E and F, you have bid to the giddy heights of a grand slam. You have to make a decision at trick 1: whether or not to take the diamond finesse.
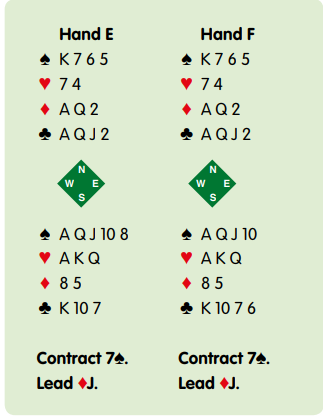
In Hand E, you have 13 top tricks: five spades, three hearts, four clubs and the ♦️A. You don’t need the diamond finesse. If you like the idea of ‘pairing up’ losers in one hand with winners opposite, all the losers in your hand are covered by obvious winners in the same suit in dummy, except the ♦️8. However, you can pair up your losing diamond with dummy’s fourth club.
Hand F looks very similar, but this time you have only 12 top tricks: four spades, three hearts, four clubs and the ♦️A. The diamond finesse is unlikely to work because players don’t usually underlead kings against grand slams, but you have no real alternative but to try it.
Sometimes, the opening lead can reduce your options. In Hands G and H, you must decide whether or not to take the diamond finesse.
In Hand G, you have eight top tricks: four club tricks, three heart tricks and the ♦️A. There are four extra tricks that can definitely be developed, just drive out the ♠️A and you have four spade tricks. However, you have two losers, the ♠️A and potentially a diamond.
Now try pairing up. The relevant pair up is to realise that you might be able to discard your losing diamond on dummy’s fourth club. The question now is: do you have time to do that?
- (i) The lead has exposed your diamond weakness. You cannot cash 4 club tricks without drawing trumps and you cannot draw trumps without losing the lead to the ♠️A. You must try the ♦️Q at trick 1. This hand is identical to Hand E, except you now have a spade loser (the ♠️A). However, that doesn’t necessarily mean that you can just follow the same line of play and make one fewer trick. The missing ace has changed the timing of the hand.
- (ii) This time your pairing up works. Win the ♥️A, drive out the ♠️A, draw trumps and cash 4 rounds of clubs. You never need to take the diamond finesse.
- (iii) Again the pairing works, as with (ii).
Hand H is virtually the same as Hand G, except this time you are missing the ♣️A. Again, you are hoping to pair up dummy’s fourth club with your diamond loser.
- (i) You have no time to use dummy’s fourth club so you must finesse the ♦️Q at trick 1.
- (ii) and (iii) This time your pairing up works as with Hand G (ii) and (iii).
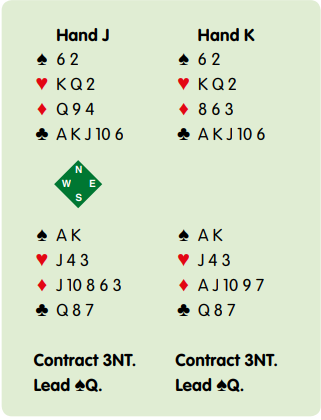
Hands J and K provide you with temptation.
In Hand J, you have seven top tricks, the ♠️A-K and five clubs. You can set up two tricks in hearts (losing the lead once to the ♥️A) or three tricks in diamonds (losing the lead twice to the ♦️A-K). However, the opening lead has knocked out one of your two spade guards and you can only afford to lose the lead once more, so you must play on hearts.
The logic in Hand K is identical. Certainly, playing on hearts will guarantee you nine tricks; however, it is worth pointing out that taking the double diamond finesse will give you four diamond tricks 75% of the time. The other 25% of the time you will fail spectacularly in a laydown contract. Playing duplicate pairs, you should take the risk.
