by Mike Lawrence

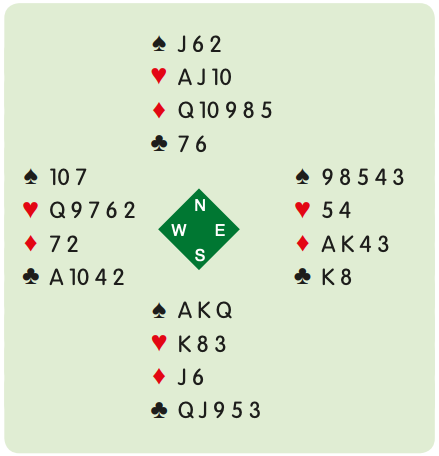
South opens 1NT(15-17) in first seat and North raises to 3NT. North has only eight high card points but he has a good five-card suit and he has the ❤️10, too. These little extras add up. Imagine, for instance, that North had the ♦️Q-9-8-7-3 instead of the ♦️Q-10-9-8-5. It would be much harder for South to set up the diamond suit. That ♦️10 is a huge plus for play in 3NT.
You get the lead of the ❤️6 from a player using fourth best leads. A reminder: it is often wise to work out what the opening leader has if possible. Sometimes it can be important. Do that before continuing.
You play the ❤️10 from dummy and East plays the ❤️5. At trick two, you lead diamonds and the ♦️J wins the first trick, West playing the ♦️7 and East the three.
When you continue diamonds, West plays the ♦️2 and East wins with the ♦️K. East continues hearts, leading the ❤️4.
Here is a crucial question. What are the hearts in your hand and dummy at this point? Do you see why this is so important?
If your hearts are ❤️K-8 facing ❤️A-J, you are going down. When you play a low heart, West can play the queen, which you win but that leaves you with the ❤️K in your hand and the ❤️J in dummy. You have no entry to dummy so even though you can set up the diamonds, you have no way to get to them. The solution comes about with proper play at trick one. I reminded you to consider what that ❤️6 indicated. Six from eleven is five. You have three hearts in dummy and two in your hand that are higher than the six. East can’t have one higher since they are all accounted for. The correct play is to win the first heart with your ❤️K. Here is the layout:
If you win the first heart with the king, you will still have the A-J in dummy and since the heart finesse is presumed to win, you can take a later finesse which will get you the entries you need.
Note that East played low on the first diamond lead. He made a good play that many would miss. Note that West played the ♦️7 on the first diamond lead. This was an effort to tell East that West had two diamonds. Giving count on defence is something that often helps partner know what to do. Sometimes you have to manufacture entries. Sometimes you have to keep the ones you have. Here is an example of keeping entries and not squandering them prematurely.

South plays in 4 ❤️ and gets a club lead. He ruffs the second club and draws trumps in three rounds, leaving himself with two trumps.
Here is what all too many declarers do next. They whack out three rounds of spades, getting rid of a diamond. Now they lead a diamond to the queen and West’s king. West leads another club, and that puts South in his hand. South still has the ♦️J and would like to lead a diamond towards his hand, but there is no way to get to dummy. He must lead a diamond from his hand instead. East has the ♦️A-10 left and gets two tricks. Down one.
A player who is not in such a rush will play in this fashion: he ruffs the second club and draws trumps. Next comes a spade to the ♠️A. At this point our winning declarer does not take the rest of the spades, but instead leads a diamond. West beats the ♦️Q with the ♦️K, but South is in command. He ruffs the next club and goes to dummy in spades. Now he cashes the last spade and leads a diamond from dummy toward his ♦️J. This line produces a diamond trick whenever East has the ♦️A or ♦️K. Premature use of entries is an expensive error. If you get the feeling that you are in the habit of taking winners as soon as you see them, think about this hand and consider if your winners might not have a use other than winning immediate tricks.