UK Edition • 14th October 2026

UK Edition • 14th October 2026
1NT is one of the most difficult contracts for declarer and the defence: quite often both sides will make a number of mistakes that might cancel each other out. However, I would say this is the contract where the number of tricks made tends to vary more than any other.
You can have the same contract making five tricks at one table and nine tricks at another: perfect declarer play against poor defence, as opposed to poor declarer play against perfect defence. Because the points tend to be spread about the table, everybody has the chance to affect the play except, of course, dummy.
The first half of the DVD deals with declarer play and the need for patience: remember that in 1NT it is important to focus on more than one suit. You do not mind the defence establishing one suit, but you cannot afford them establishing two suits.
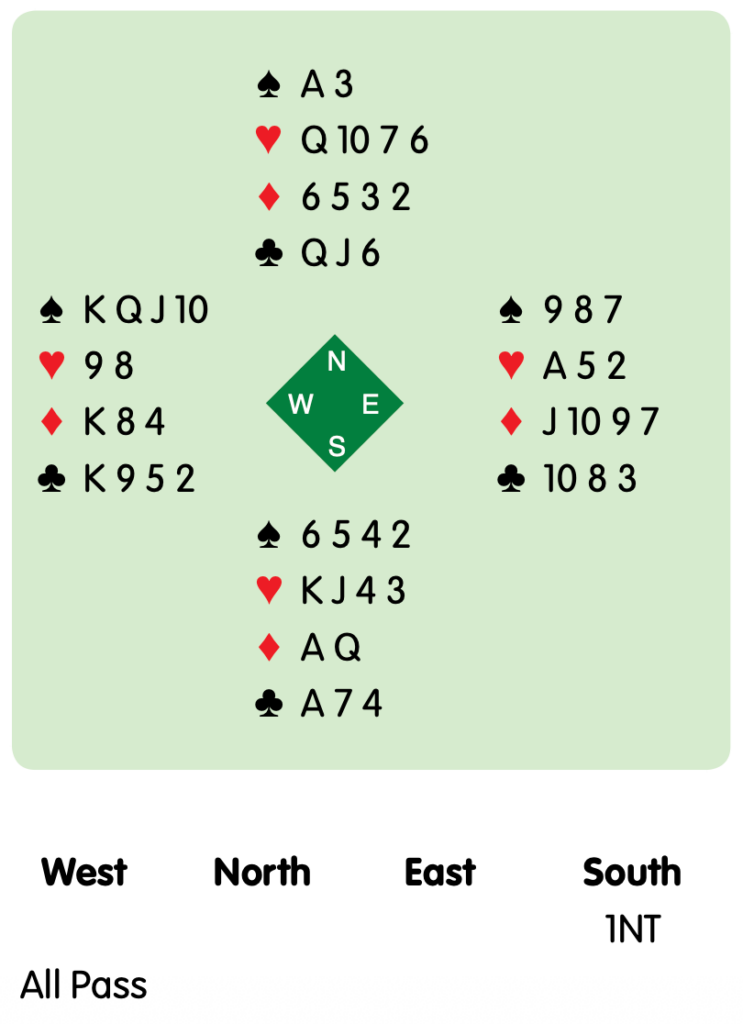
You open 1NT as South and are left to play there. West leads the ♠️K. You are likely to lose tricks in the spade suit, but your job is to avoid allowing the defence to attack diamonds. To this end, you aim to keep East off lead early in the play. You are aiming to develop tricks in clubs and hearts, but in hearts, either defender might win the defensive trick, whilst in clubs, it is only West who can win. So your plan should be to play on clubs first.
You win the ♠️A and lead the ♣️Q, which runs to West’s king. He takes three spade tricks, but cannot attack diamonds from his hand. East gets the lead with the ❤️A, but by then you have established your seven tricks: three hearts, two clubs and the two other aces.
Had you played on hearts first, East would win and if he had seen the second part of this DVD, he would not have returned a spade woodenly, he would switch to diamonds (up to dummy’s weakness). The defence would establish the diamond suit along with the spades, so you would have to settle for six tricks: three hearts and three aces.
The second part of the DVD deals with the defence against 1NT contracts and, once again, there is a focus on patience: try to avoid switching without good reason. Too often, defenders feel an urge to switch just because a lead has gone wrong. Once the opening lead has been made, you cannot un-make it: what is lost is lost and, quite often, by simply continuing that suit you do not give anything more away. One of the main focuses is on frozen suits: when each player has one honour in a suit: the side that leads the suit gives a trick away. These kinds of suits are more common in 1NT contracts because the points are divided evenly around the table.
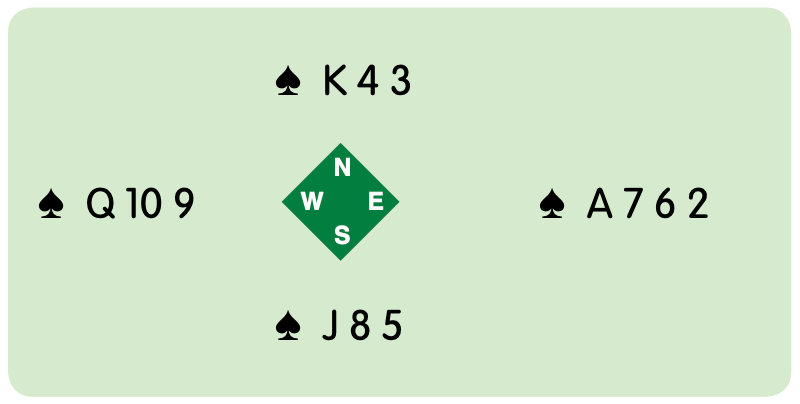
Here is a simple example of a frozen suit. If East or West lead spades, then declarer (South) will make a trick: eg West leads the ten and North plays low: East plays the ace to stop the jack winning, but now North’s king makes. If North or South lead the suit, they may well give up the whole suit. North might lead small to South’s jack, but West wins the queen and can then lead the ten back trapping North’s king and making the whole suit for East-West.
However, sometimes dummy will tell you that there is a good suit to switch to: if dummy is on your right, look for the weakest suit in sight, if dummy is on your left, lead through heft.
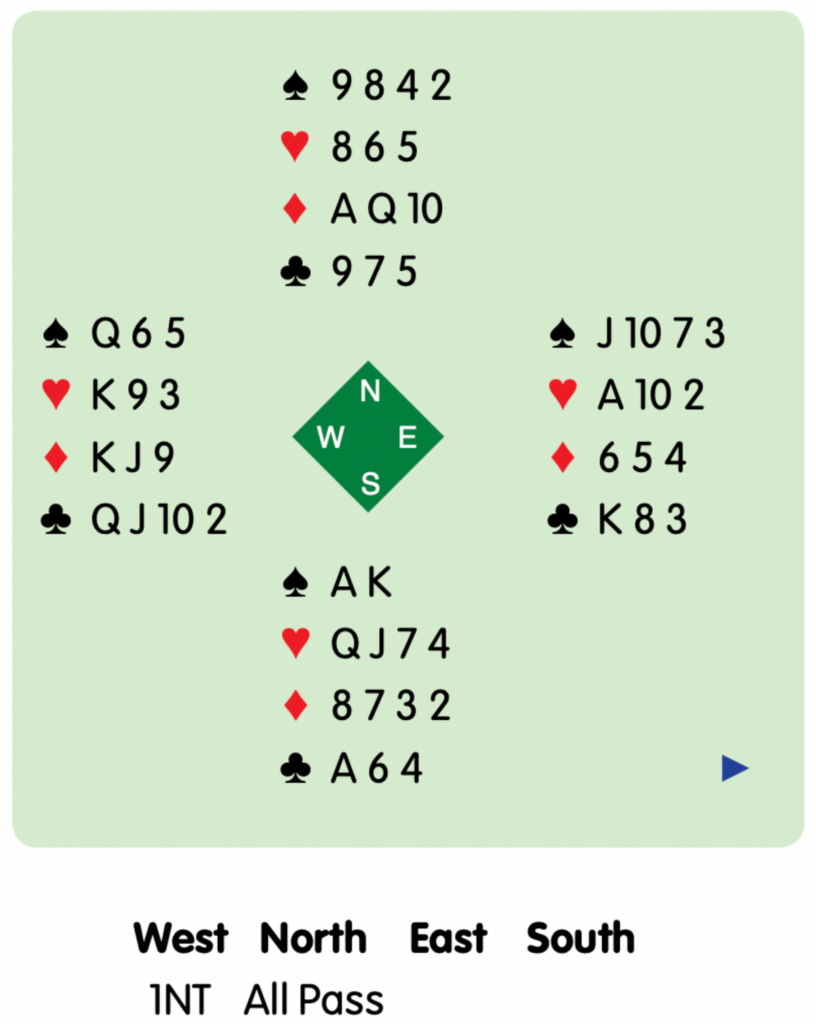
Once again the auction is simple with West opening 1NT. You are South and your partner leads the ♠️8 to your king.
Your partner’s lead is a high spot card, which would suggest a weak holding in the suit: placing declarer with the ♠️Q, you contemplate switching. But to what? You do not look at your hand to decide, you look at dummy.
Dummy is on your right and there is a stand-out weakest suit: diamonds. You switch to a diamond, but are careful to switch to the ♦️8: high to deny an honour.
Your partner wins the ♦️10 and switches back to spades, which you win and continue with the ♦️2 to partner’s queen. North cashes the ♦️A and, eventually, you win your ♣️A and cash your fourth diamond as the setting trick.
Perfect defence: you needed to lead diamonds twice and have a third entry to make your fourth diamond. So often, the right defence is found by looking at dummy and not your own hand.
Clearly, hearts look a better prospect if just looking at your hand, but a heart switch on this hand would offer declarer the chance of three tricks in the suit.
Get better at playing and defending 1NT and you will start enjoying the most common contract of all. No more fear of finishing in or defending 1NT, instead, the hope that your scores will improve whether declaring or defending.